Wilson Gramer / 2022-07-24
How to set up AWS App Runner with ElastiCache and MongoDB
In this article, I'll explain how to set up AWS App Runner with ElastiCache and MongoDB using a custom VPC.

July 24th, 2022
In this article, I'll explain how to set up AWS App Runner with ElastiCache and MongoDB. App Runner works with MongoDB out of the box if you choose "Public access" during setup, but ElastiCache can only be accessed within a custom VPC. I'll show you how to create this VPC, give it access to the internet, peer it with MongoDB, and set up ElastiCache.
Creating a VPC
The first step is to create a VPC to group your resources together and make them accessible from each other. Log into the AWS console and navigate to the VPC dashboard using the search bar. Then, click the orange "Create VPC" button and choose "VPC and more" under "Resources to create". Give your VPC a name — I'll keep the default name of "project" — and ensure "Auto-generate" is selected. Keep the default IPv4 CIDR block as 10.0.0.0/16, and select "No IPv6 CIDR block". Next, choose two availability zones, two public subnets, and two private subnets. Don't add any NAT gateways; we'll do that later. Under "VPC endpoints", choose "None". Finally, ensure "Enable DNS hostnames" and "Enable DNS resolution" are both checked.
Your setup should look like this:
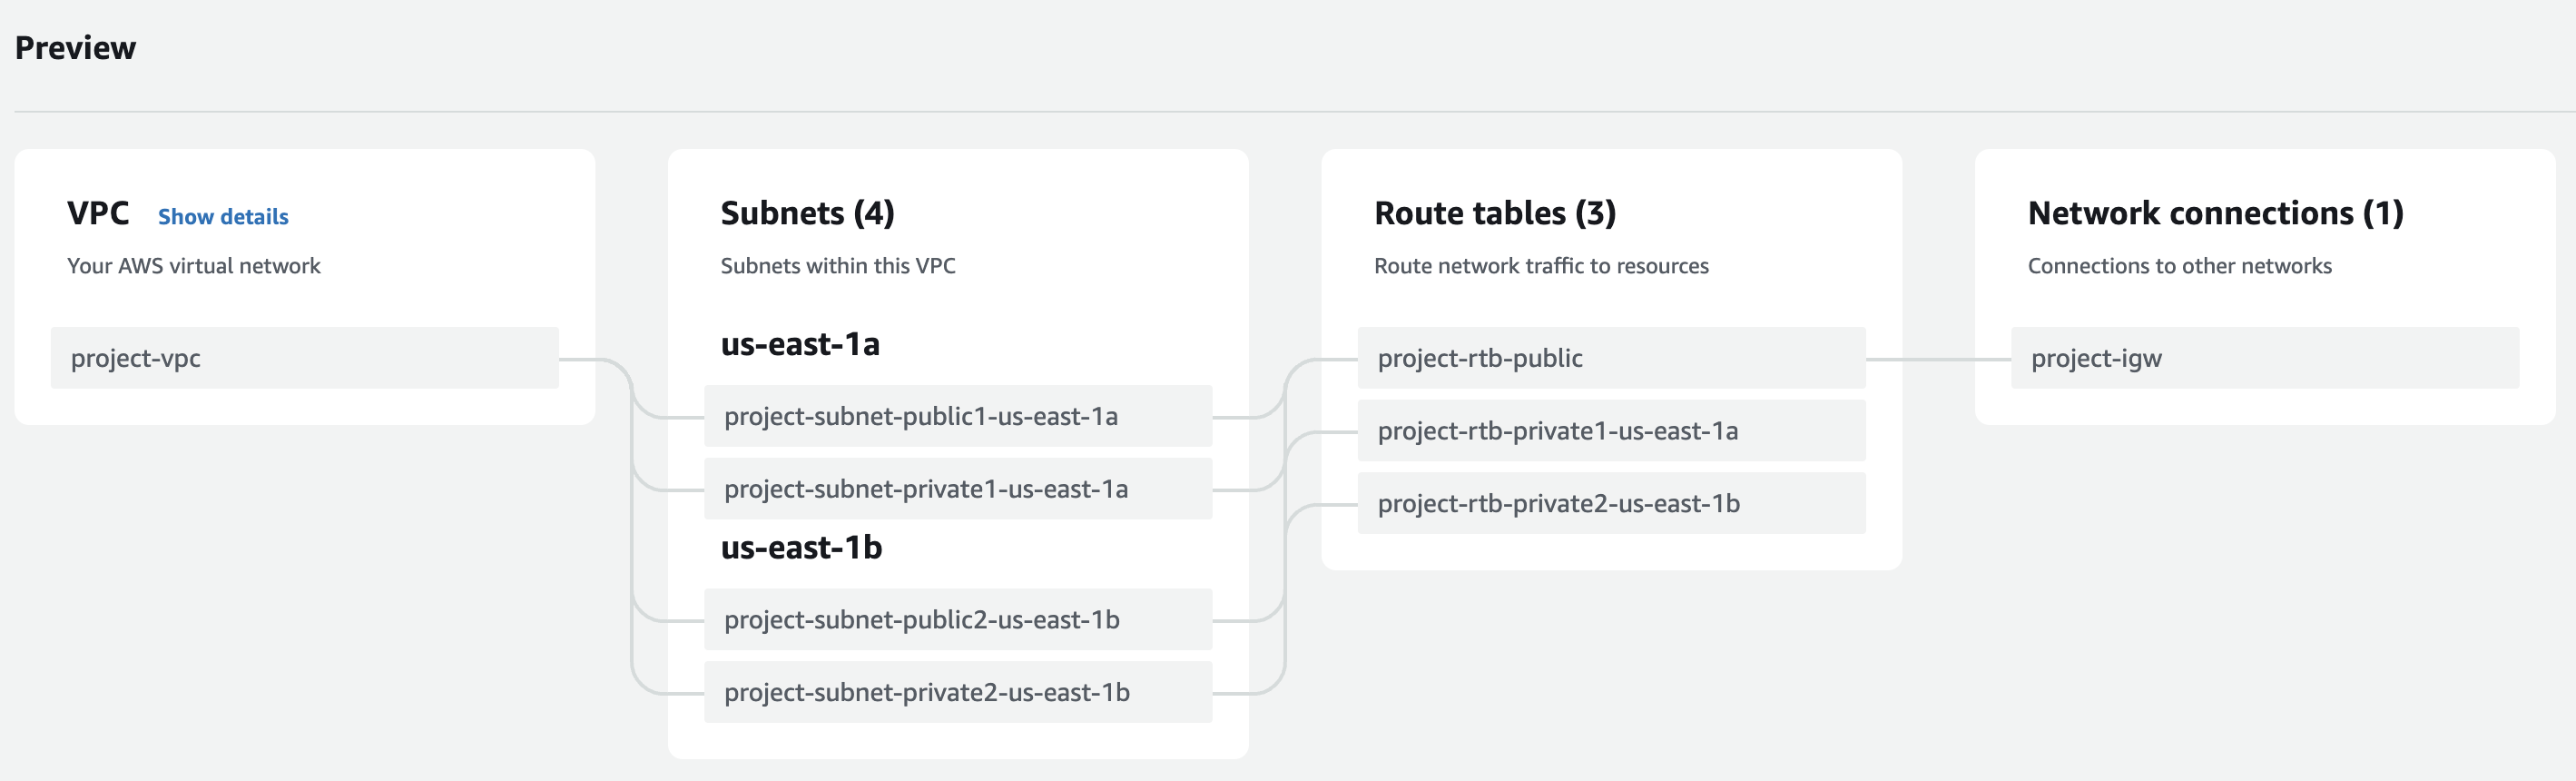
Finally, click "Create VPC" and write down the generated VPC ID (it should be vpc followed by a string of hex digits).
Setting up the security group
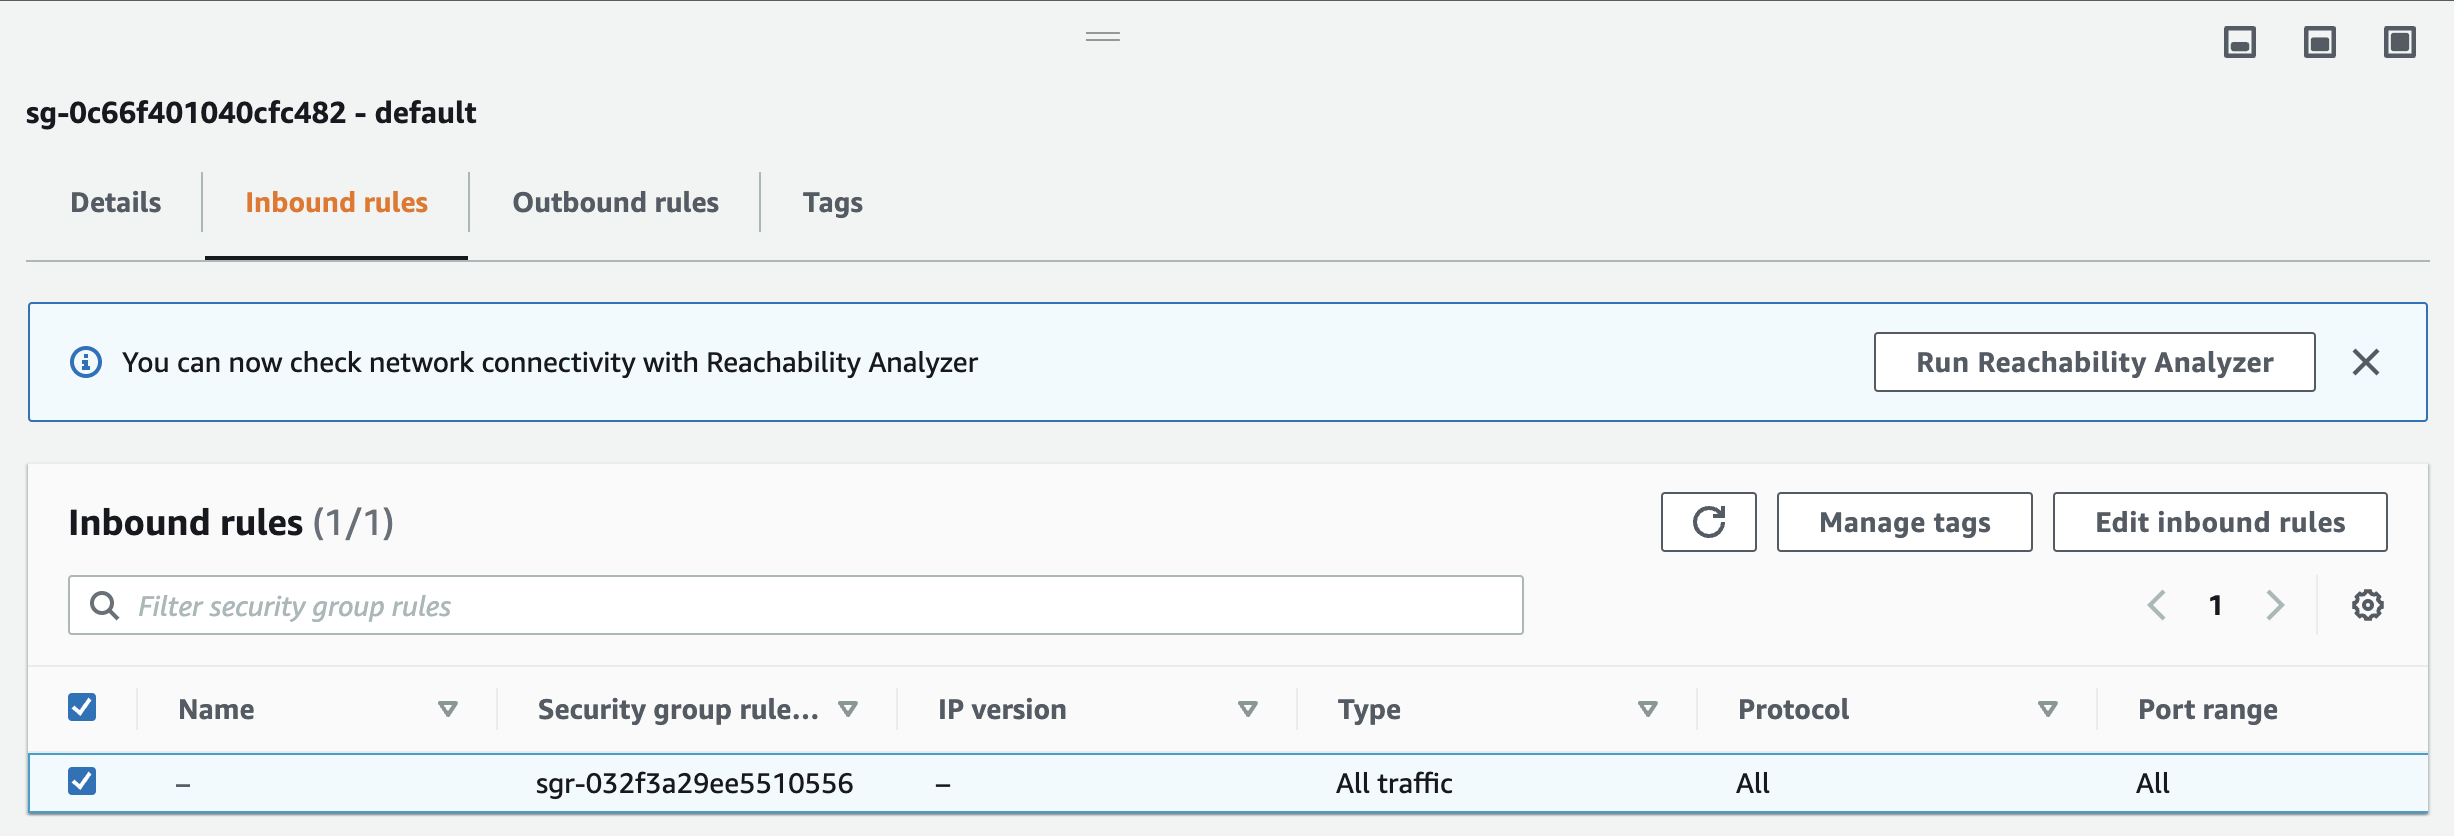
Next, we'll configure the security group used to restrict inbound and outbound traffic from our App Runner instance. For now, we'll set it up to allow all traffic, but you can restrict it to specific ports and IP addresses after you've verified everything is working.
Navigate to "EC2" using the search bar, and select "Security Groups" under "Network & Security" in the sidebar. Click on the security group named "default" with the ID of the VPC you just created. Under "Inbound rules", verify that all traffic is enabled:
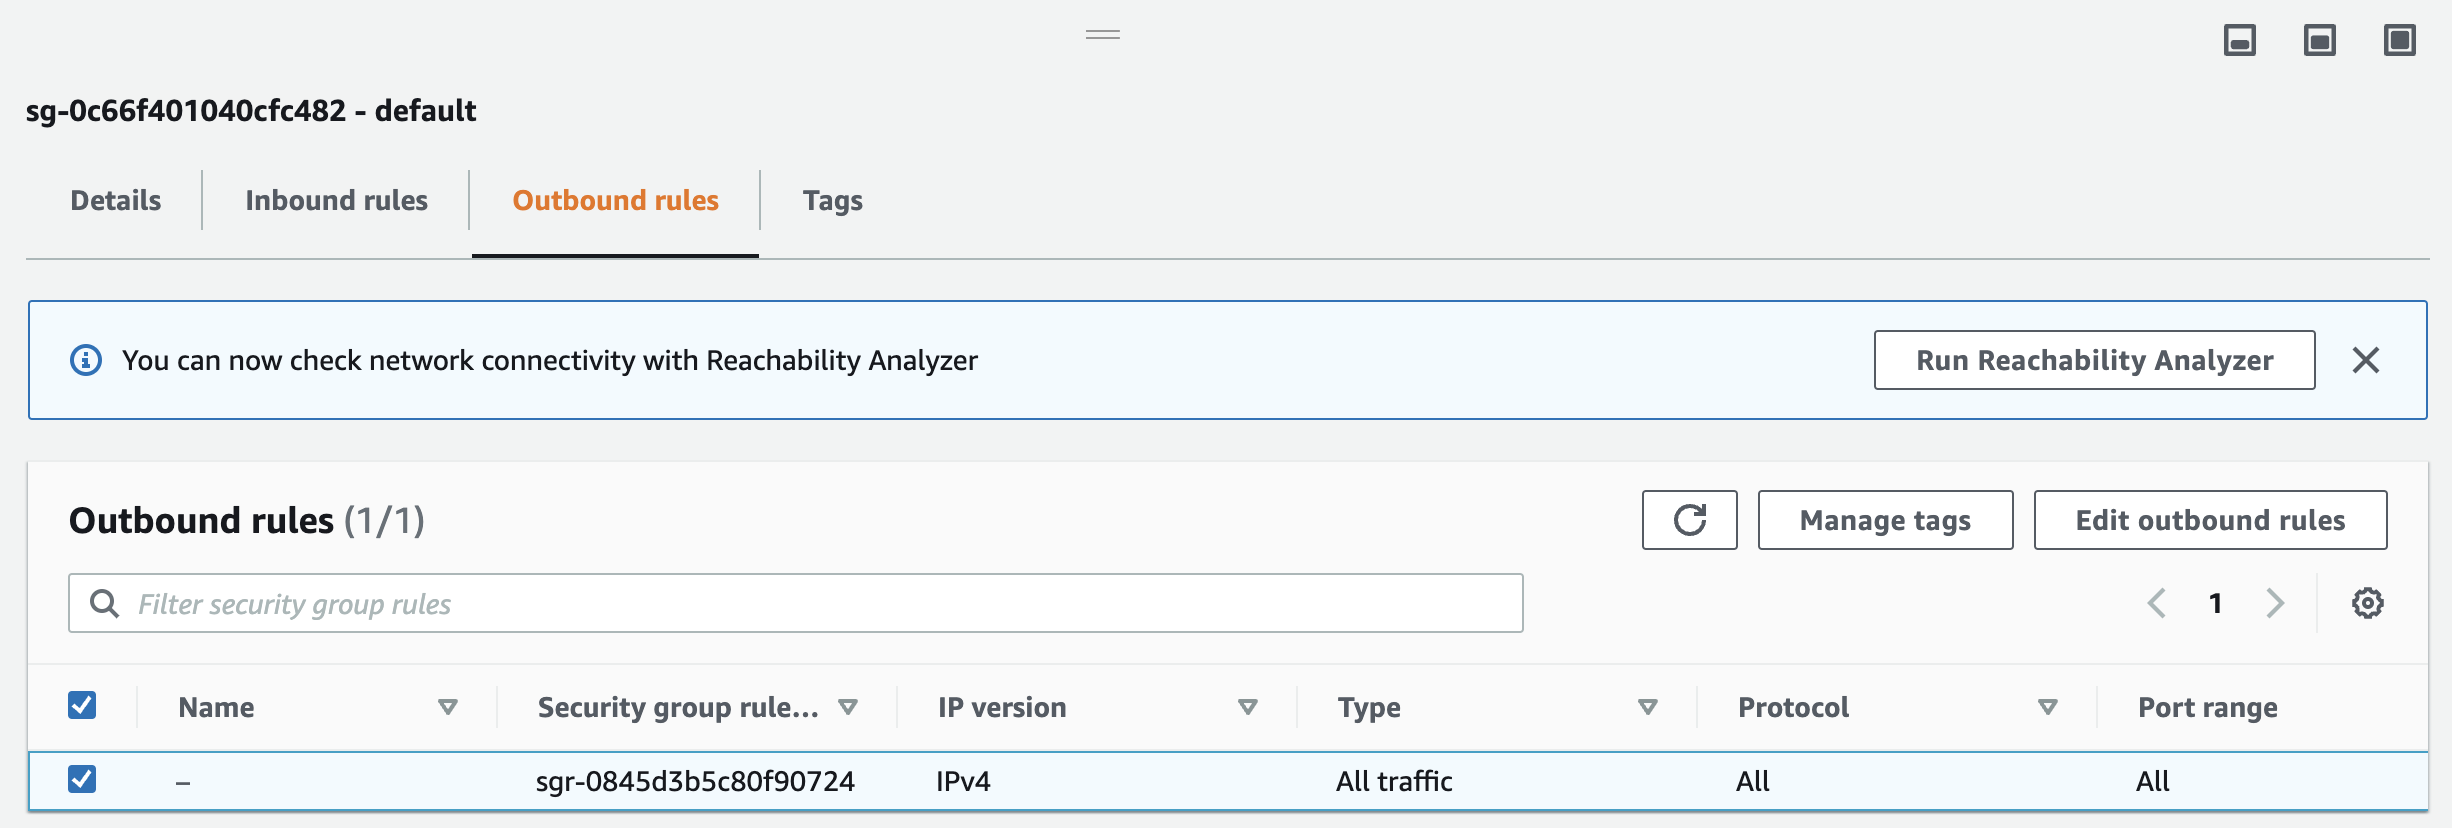
And do the same for "Outbound rules":
Adding NAT gateways
The next step is to give our services access to the internet by setting up NAT gateways. Go back to the VPC dashboard and select "NAT gateways" in the sidebar. Click the orange "Create NAT gateway" button, and select the public1 subnet belonging to your VPC. Keep the "Connectivity type" set to "Public", and click "Allocate Elastic IP" to give your NAT a public IP address. Then, click "Create NAT gateway". Repeat this process for the public2 subnet.
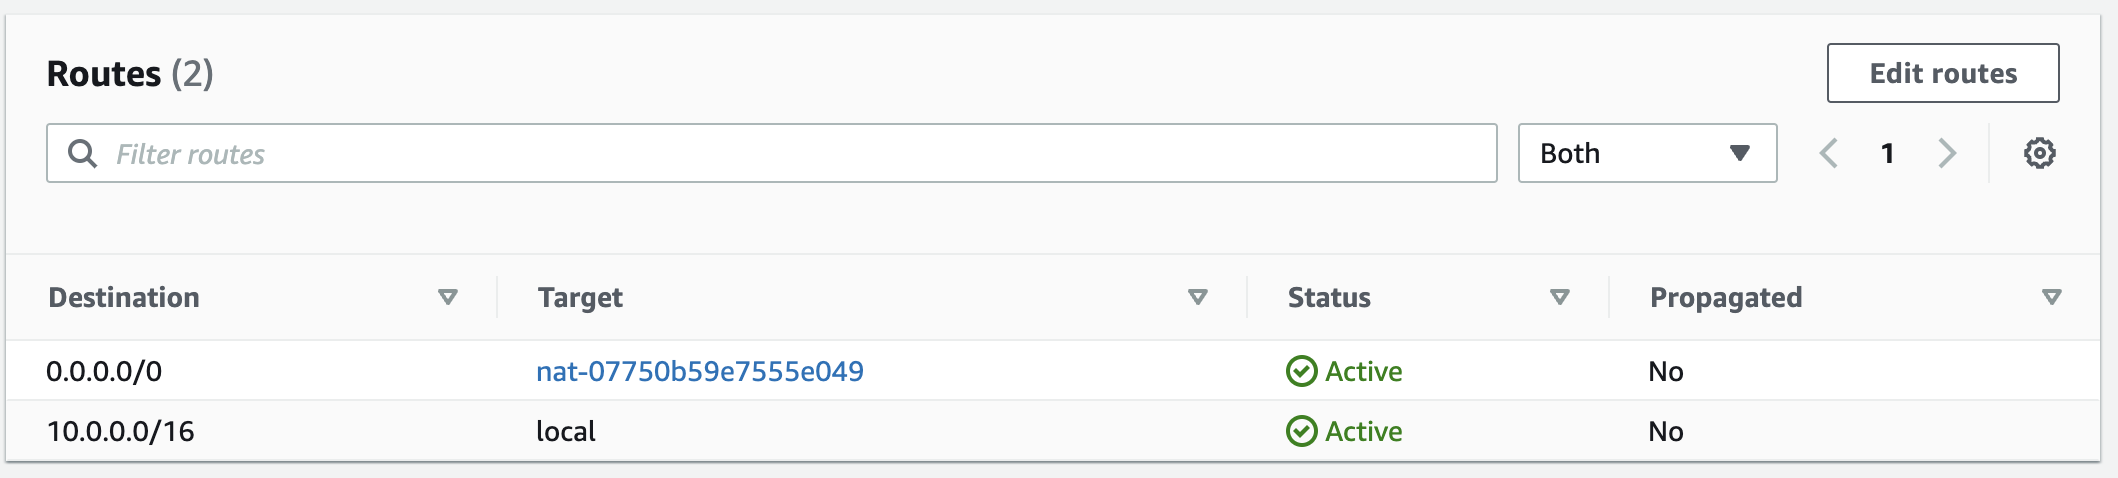
Next, we need to assign our NATs to their respective private subnets. Click "Route tables" in the VPC sidebar, and choose the private1 subnet. Click on "Routes" in the detail pane and then click "Edit routes". Add a new route whose destination is 0.0.0.0/0 and whose target is the ID of the NAT gateway you created for your public1 subnet. Click "Save changes", and ensure the route table looks like this:
Then, repeat the process for the private2 subnet by assigning the NAT corresponding to the public2 subnet.
Setting up ElastiCache
Now that our VPC is configured, we can set up the ElastiCache instance. If you want to connect to another AWS service from App Runner, the process should be similar. First, navigate to the ElastiCache dashboard using the search bar. Click "Redis clusters" in the sidebar, and then "Create Redis cluster". Keep the "Cluster mode" set to "Disabled", and give your cluster a name. Keep the "Location" and "Cluster settings" set to their defaults. Under "Subnet group settings", click "Create a new subnet group" and set the "VPC ID" to the ID of the VPC you created previously. Ensure that all four subnets (the two public subnets and the two private subnets) are listed. Then click "Next" and configure your cluster as desired. On the last page, click "Create". Wait a few minutes for the cluster to initialize, and then write down the cluster's primary endpoint — you'll need it to connect to the cluster.
In order to enable connections between App Runner and ElastiCache, we also need to create an IAM role. Navigate to the IAM dashboard using the search bar, and click on "Roles" in the sidebar. Click the blue "Create role" button and select "Custom trust policy". Paste in the following trust policy:
{
  "Version": "2012-10-17",
  "Statement": [
    {
      "Effect": "Allow",
      "Principal": {
        "Service": "tasks.apprunner.amazonaws.com"
      },
      "Action": "sts:AssumeRole"
    }
  ]
}
Then click "Next", and add the AmazonElastiCacheFullAccess permissions policy. Click "Next" and verify that your configuration looks like this:
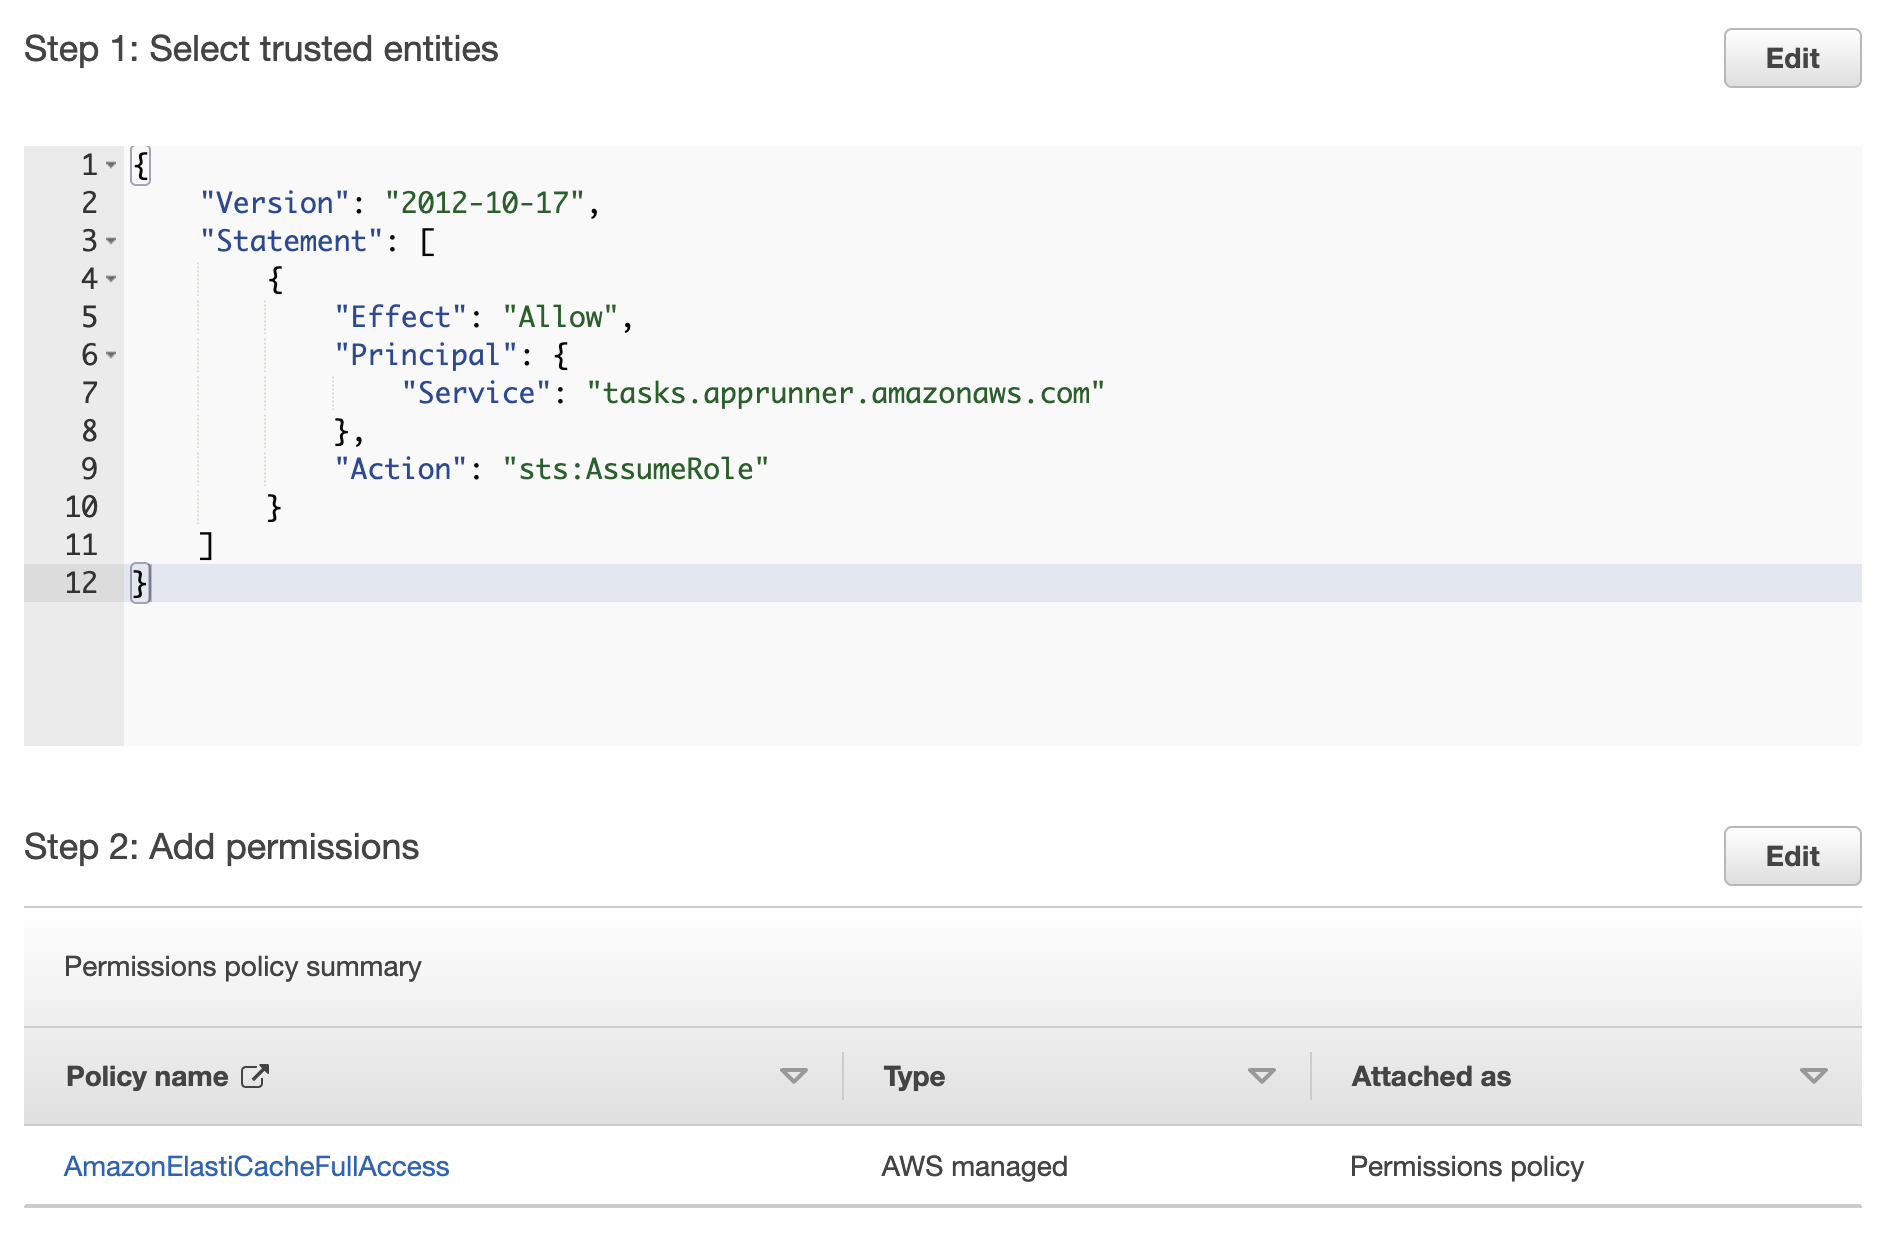
Finally, click "Create role".
Setting up MongoDB
As of July 2022, MongoDB has a great article on how to set up VPC peering — check it out here! VPC peering is only required if your database restricts connections to certain IPs; if your database allows all traffic, then you can skip this step. You shouldn't need to configure the security group as mentioned in the article since we have it set to allow all traffic, but once you limit the security group to only allow certain connections, be sure to add ports 27015 through 27017.
Configuring App Runner
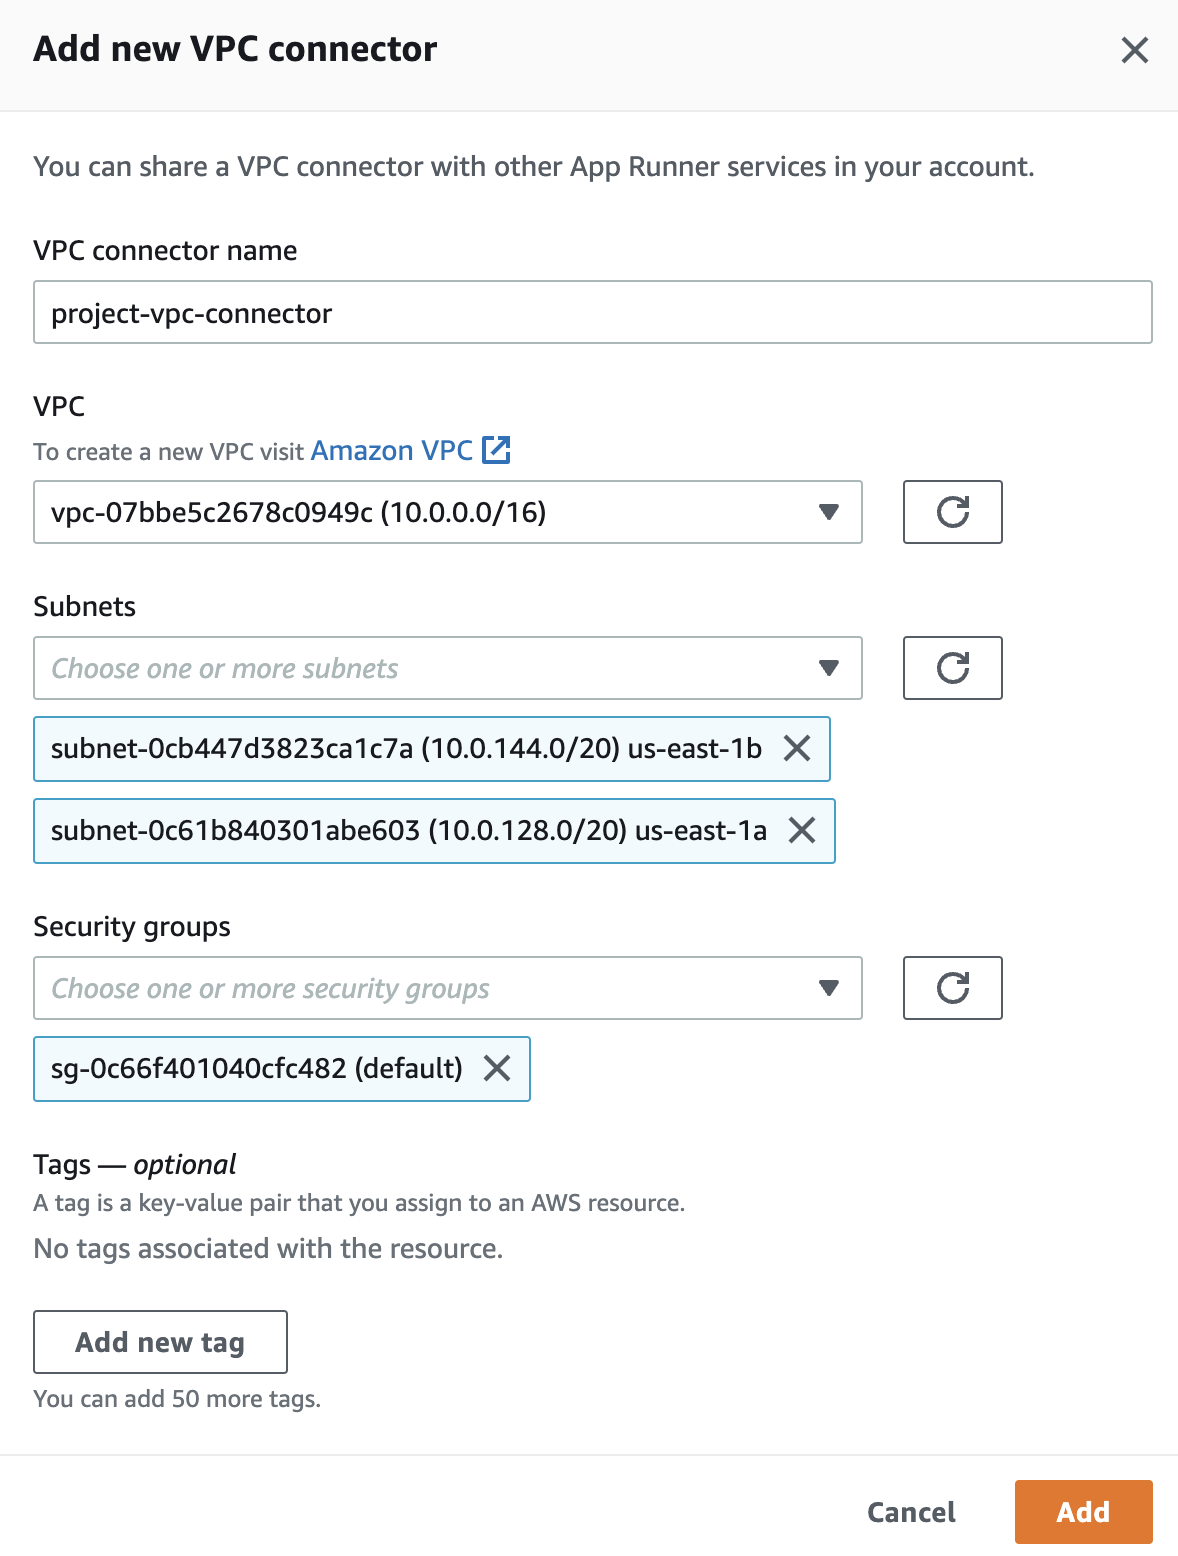
Finally, let's configure App Runner! Go to the App Runner dashboard using the search bar, and click the orange "Create service" button. Choose your container image from ECR, set the deployment trigger to either "Manual" or "Automatic", and create a new service role under "ECR access role" if needed. On the next page, under "Security", choose the instance role you created above. Under "Networking", choose "Custom VPC" and click "Add new" under "VPC connector". Give the VPC connector a name, choose the VPC you created, and then choose the private subnets. It's important to only choose the private subnets in this step — make sure the public ones aren't selected! Then choose the default security group for the VPC, and click "Add". Your configuration should look like this:
Go to the next page, verify that everything looks correct, and then click "Create & deploy"!
Congratulations, you've just set up an App Runner instance with access to ElastiCache, MongoDB, and the public internet! Let us know if you encounter any problems during setup.

Wilson is a passionate student and developer studying computer science at the Worcester Polytechnic Institute. At Make Directory, he works on mobile app development and machine learning. In his free time, he enjoys programming, running, and playing the piano.